Showing posts with label Desserts. Show all posts

Friday, April 2, 2010

Pomegranate-Apple Jelly!!

My dad has got his big promotion today and i'm soooo excited about it.......Congratulations Daddy!! He is THE MOST down-to-earth person i've ever seen in my entire life. Am so proud to be his daughter. He's been a great inspiration to me and i always wanted a life parter who can be as good as him, luckily i got one :)). To celebrate my dad's achievement, i made this colorful yummy Jelly today, I wish my parents were here to c how happy i'm. Keep your cool this summer with the Jelly recipe i'm gonna share now!!

Pomegranate-Apple Jelly is a beautiful two layered dessert that pairs a translucent gold colored apple jelly with a shimmering garnet colored pomegranate jelly. One spoonful will tell you this is not the wobbly children's dessert made by stirring a fruit flavored powder into water. This jelly uses real pomegranate juice and real apple juice so it captures the true essence of these fruits.


I was also surprised at how quick and easy it is to make. All you do is stir unflavored gelatin into real fruit juice. If you are using sweetened fruit juices, then leave out the sugar that is called for in the recipe. Also, I like to use the unflavored gelatin that comes in powdered form, which is sold in the baking section of most grocery stores. 
It comes in small boxes which hold four - 1/4 ounce (7 grams) (scant tablespoon) paper envelopes of tiny granules of powdered gelatin. These granules are tasteless, colorless, and odorless and in order for them to become a thickening agent, the pomegranate juice and the apple juice need to be hot. 

Look at that beautiful 2 layered texture...........YUMMYYYYYYY!


So we start the recipe by sprinkling three teaspoons of the unflavored gelatin over one third cup of cold water and then leave it, untouched, for about five to ten minutes so the gelatin has time to soften and become all swelled and spongy. Meanwhile we heat the lightly sweetened pomegranate juice until very hot, but not boiling. 
The softened gelatin is then stirred into the hot pomegranate juice and placed back over low heat until the gelatin has completely dissolved (stir constantly). (To check to see if the gelatin has completely dissolved, dip a spoon into the gelatin and check to see that all the crystals have melted.) The jelly is then removed from the heat, left to cool slightly, poured into serving glasses, and refrigerated for two to four hours or until set.


The process is repeated for the apple jelly.


Pomegranate Jelly:
3 teaspoons unflavored powdered gelatin
1/3 cup  cold water
2 cups unsweetened Pomegranate Juice
1/2 - 2/3 cup  granulated white sugar


Directions: Sprinkle the gelatin over 1/3 cup (80 ml) of cold water. Let this mixture sit for about five to ten minutes, or until the granules have become swelled and spongy. Meanwhile, in a saucepan, heat the pomegranate  juice and sugar until very hot (do not boil), stirring constantly to dissolve the sugar. Stir the softened gelatin into the hot juice and place this mixture over a low heat and stir constantly until the gelatin has completely dissolved. Do not boil. Remove from heat and let cool for about 10 minutes before pouring equal amounts into serving glasses. Refrigerate for about 2 - 4 hours or until set.


Apple Jelly:
3 teaspoons unflavored gelatin
1/3 cup cold water
2 cups unsweetened Apple Juice
1/3 - 1/2 cup granulated white sugar

Directions: Once the pomegranate jelly has set begin the apple jelly. Sprinkle the gelatin over 1/3 cup (80 ml) of cold water. Let this mixture sit for about five to ten minutes, or until the granules have become swelled and spongy. Meanwhile, in a small saucepan, heat the apple juice and sugar until very hot (do not boil), stirring constantly to dissolve the sugar.  Stir the softened gelatin into the hot juice and place this mixture over a low heat and stir constantly until the gelatin has completely dissolved. Do not boil. Remove from heat and let cool for about 10 minutes before pouring the apple jelly over the set pomegranate jelly. Refrigerate for about 2 - 4 hours or until set.


Garnish with fresh pomegranate seeds or grapes or any fruits and/or softly whipped cream or vanilla ice cream. This dessert can be made a day ahead.


Try to use 100% real juices and also unsweetened ones so that you can adjust the sugar level as needed. This jelly tastes like Jam, it also goes great with bread. Kids will enjoy this dessert bcoz of the impressive texture it has got.


Thanks for watching the recipe.
Hope you have a great weekend.
Will c u soon with yet another Temptation!

Wednesday, March 3, 2010

Plum Upside-Down Cake OR 'Tatin' !!

Here i'm with yet another Temptation, call it an Upside-Down cake or TATIN or even CLAFOUTIS (baked french dessert)...this recipe is just one of the greatest inventions ever, crazy simple to make, yet so exotic.


There is no doubt that if you make this cake right, you will drool in it!! I have wanted to make this recipe ever since I saw Ina make it on "Barefoot Contessa", and today I bit the bullet. I've never tried to make a tatin until today and I'm so glad that it came out so well.
It ended up being super easy to make and the cake popped out with no problems. This was my first ever attempt at caramelizing sugar too,and it went well--though I don't have a candy thermometer. 


Good thing about this cake is that you really can use any fruit you'd like, substitute whatever fruit or fruits look yummy for the season and this dessert always tastes delicious! I went for red big plums this time but next time i'm going to try apples and peaches. Berries, cherries or even sliced bananas would be great if you want to  try the tatin.

Sour cream keeps the cake moist. It is kind of juicy, but I love the juice and caramel that have soaked into the cake; it's a yummy, squishy, comforting dish of AWESOME! Its a great dessert if you want decadence but not super heavy. All in all, this cake is gorgeous and impressive visually, but more importantly, it's completely divine and delicious!


Here's the recipe:

Prep Time: 15 Minutes
Cook Time : 1 Hour

You will Need:

6 tablespoons (3/4 stick) unsalted butter, at room temperature, plus extra for greasing the dish 
10 purple or red "prune" plums, cut in half and pitted
1 3/4 cups granulated sugar, divided
2 extra-large eggs, at room temperature
1/3 cup sour cream
1/2 teaspoon grated lemon zest
1/2 teaspoon pure vanilla extract
1 1/2 cup all-purpose flour
1/2 teaspoon baking powder
1/4 teaspoon salt
Confectioners' sugar (optional)

Directions:

Preheat the oven to 350 degrees F. Generously butter a 9-inch glass pie dish and arrange the plums in the dish, cut side down.

Combine 1 cup of the granulated sugar and 1/3 cup water in a small saucepan and cook over high heat until it turns a warm amber color, about 360 degrees F on a candy thermometer. Swirl the pan but don't stir. Pour evenly over the plums.

Meanwhile, cream the 6 tablespoons of butter and the remaining 3/4 cup of granulated sugar in the bowl of an electric mixer fitted with the paddle attachment, until light and fluffy. Lower the speed and beat in the eggs one at a time. Add the sour cream, zest, and vanilla and mix until combined. Sift together the flour, baking powder, and salt and, with the mixer on low speed, add it to the butter mixture. Mix only until combined.

Pour the cake batter evenly over the plums and bake for 30 to 40 minutes, until a cake tester comes out clean.


Cool for 15 minutes, then invert the cake onto a flat plate. If a plum sticks, ease it out and replace it in the design on top of the cake.
Serve warm or at room temperature, dusted with confectioners' sugar.


Quick Notes:

Go light on the lemon zest - Its nice to have it but it can easily overwhelm the cake.

I ended up slicing the plums and drying them with a papertowel, then after caramel was almost hardened I noticed quite a bit of juice on the top so I was able to pour off the excess prior to adding the cake.  It was not only delicious but the presentation was gorgeous!

Let the top get nicely brown and when you pull it out of the oven, hold it above your head and make sure that all the bottom surface of the pan is bubbly and juicy.

Be ready to pour the sugar mixture over the fruit as soon as it's ready. It can go from just right to burned in a matter of seconds!

Once the cake is baked and turned out on the platter, sprinkle it with cinnamon if you don't want confectioner sugar. Telling you again, you'd just drool over a piece of this cake, its so luscious. It will be a hit dessert for any kind of party.
Here goes the final click and the last piece!! Enjoy.


Hope you had fun reading the making of this tatin. 
Do write to me if you have any queries.
Adios for now. Will come back soon with another interesting Temptation shortly.

Tuesday, July 21, 2009

My 50th Post.....A quick recap!!

Yeah i know most people celebrate their 100th post and 50 isn’t a huge number but screw all that! I'm proud that I have made it to my 50th post... so wat if i'm a bit late!

It seemed just yesterday that I started this blog…sorry not yesterday, 5months to be more precise but I must admit i wouldn’t have been here without your support , so thanks to all of you.... you are so special to me!!

I also feel so elated that my blog is being liked and followed by many fellow bloggers, i am very glad i could make a place in your heart through Temptations. I hope this bond continues for ever. Your love n encouragement means a lot to me.

I figured since it is my 50th post I would quickly run through some of my interesting temptations . Sorry, there isn’t any new recipe in this particular post. But I promise I will make it up to you in my next post!

So here are some of my best dishes.

Click on the name for the recipe details.


And there we have it....My 50th post.

I hope it wasn't too lame or boring for you.

As per my promise i will come with an interesting temptation soon.

Till then Adios.

Sunday, July 12, 2009

Birthday Wishes!!

Today is my husband’s special day and sadly he’s not around, he’s on a business trip thousands of miles away from me. So I thought of celebrating his birthday in advance!

When it comes to surprises, well I must say I’m horrible at it, even before I plan a surprise, my face and my anxiety says it all…..but not this time bcoz I did succeed in surprising him a bit, Just a bit.

Ask me how?? Well it was simple.....first of all made a proper cake in advance (proper bcoz somehow I always ruined his b’day cake), made quick arrangements while he was away from home, invited some of our close friends , decorated the house with balloons and also gave the biggest surprise with a montage which i posted on youtube.....check this out!!!


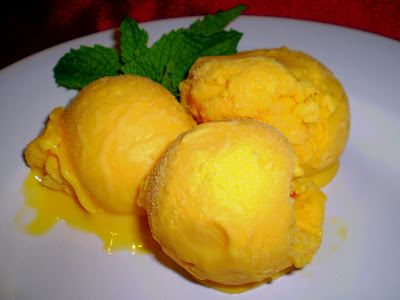
So the menu was a combination of North-indian and South-indian cuisine, Mango ice-cream for dessert and ofcourse the most important chocolate cake!!! Overall it was a nice birthday party and i made him feel special which he is and will always be!


So let me share the recipes for Chocolate cake and Mango ice-cream!


Chocolate Cake recipe: I already made a chocolate cake sometime back. so just followed the same recipe again. Here's the link:


Mango Ice cream Recipe: This is a fruity cool treat that everyone will love and enjoy. Its the simplest and also the best.

You will need:

2 cups Mango pulp ( i used store bought)

1 cup condensed milk (Nestle carnation)

1 cup heavy cream


Directions:

Take a bowl and mix the mango pulp and condensed milk.

In a seperate bowl whip the cream till it becomes nice n fluffy.

Now add this cream into the mango mixture using a whisk.

Once done, transfer the mixture to a bowl which has a lid and allow it freeze for a couple of hours.


Let it sit in the freezer for 3-4 hrs and mango ice cream looks like this.


Serve it in your favourite dish!


one more pic!


These are the 2 Temptations of the day.

Hope you had a nice weekend.

Have a great week ahead.

Stay tuned as always.

Tuesday, April 28, 2009

Jalebi (North-Indian dessert)!!

Thanks to all those who were waiting for my next post and sorry for keeping you waited as i was making sure to come up with an "Interesting Temptation", and so here i come with the king of sweets....JALEBI!!!

This crispy, syrupy dessert is well loved everywhere in India. One of India’s favorite sweets ( I say this because it’s my favourite too ) and it’s history goes back to the days of kings and queens. Though it’s origin is not known exactly, many believe it came out of the kitchens of Punjab or Rajasthan.


Whenever I think of Jalebi, I cannot forget the advertisement (Ramu Kaaka – Jalebiii) which used to come years ago in our TV channels , I loved watching it back then, love it even now!


Not going by the looks, Jalebi has a soft and chewy taste and usually eaten when it's hot and dipped in sugar syrup. For those who haven’t tasted Jalebi, here’s your chance to do so.


There are many recipes on Jalebi...The trick to getting right Jalebis is getting correct fermentation of the batter. Keep trying variation in temperature and slight adjustment of the ingredients to master this skill that all your family and friends would love. I fermented the batter for 24 hrs, it gives tartness to the jalebi.


Don't get dissapointed if you end up with bad shapes in your first attempt......this is my 3rd attempt.

You will need:

2 cups All purpose flour

2 tbsp rice flour (it is added for extra crunchiness)

3/4th cup yogurt + 1/2 cup warm water

1/2 tsp baking powder (yeast can also be added instead)

1/2 tsp saffron threads, slowly dry-roasted and powdered

Ghee or vegetable oil for frying

For Syrup:

2 cups sugar

1 cup water

1/2 tsp green cardamom seeds powder

11/2 tbsp rose water

Directions:

Mix the flour, baking powder, yogurt and warm water in a bowl.

Add a pinch of saffron to it and whisk until smooth.

Keep the batter aside for 24 hours to ferment.

Whisk thoroughly before use.

Pour the batter into a ketchup dispensing bottle or a cone.

Step 1 shows batter on 1st day

Step 2 shows batter after 24 hrs fermentation

Step 3 shows the sugar syrup

Step 4 shows the jalebi done in the hot oil


I use a disposable Pastry bag as it is very convenient to hold and press for the desired coils.

Prepare one string syrup by dissolving sugar in the water and rose water mixture.

Just before the syrup is ready add saffron and cardamom powder.


Heat oil in a wok.

To test for the right temperature, drop a small amount of batter into the oil. If it sizzles and rises to the top of the oil, the oil is hot enough. Keep the flame on medium at all times to ensure all round cooking of the jalebis.

Pour the batter in a steady stream to form coils. Make a few at a time.

Deep fry them until they are golden and crisp all over but not brown.

Remove from the wok and drain on paper towel and immerse in the syrup.

Leave for at least 2-3 minutes till they completely soak in the syrup.

Take the jalebi out of syrup.

Served hot on the streets of india, it goes really well with ice cream or the other indian dessert - rabdi.

Here's my first attempt pic.

My 2nd attempt pic

My 3rd attempt pic


Showed all the 3 pics to say that practice definetely makes us perfect.

This is the most Cruncy, juicy and mouth watering dish i've ever tasted.

So this is all about Jalebiiiiiiiiiiiiiiiiiiiiiiiiiiiiiiiiiiiiii.

So i guess this is all for now. Will come again soon with yet another Temptation. Till then take care and have a happy weekend.

This Jalebi is on its way to 'Mithai Mela' hosted by Srivalli.