Showing posts with label Chocolate. Show all posts

Friday, February 19, 2010

Chocolate Chile Cake (CCC)!!


I'm back again with a Temptation which is called C3, CHOCOLATE CHILE CAKE . If you are a chocolate person, this is the cake for you bcoz it is the GOD of chocolate!! I happened to watch the first episode of Daisy Martinez on food network by accident and knew right away once she stated that there was NO FLOUR in this cake that I had to make it right then for no occasion and no reason at all.

I followed the recipe and could hardly wait to see what it looked like the next morning. I would have loved to serve this cake with the cinnamon ice cream but last minute did not find any so I got a mint ice-cream instead and served with raspberries. Thanks to the FN for a great tasting flavorful cake.

The reason why this cake is so special is.........Easy to make. Looks beautiful. Incredibly rich. No flour needed. Strong coffee flavor and a small slice is plenty. This cake turned out perfect on the first try and it tasted like something out of a gourmet chocolate shop, in other words just EXQUISITE . The espresso really brings out intense flavors in the chocolate, while the cayenne pepper creates a subtle warmth in the back of the throat giving a new level of complexity. Adding chili to cake may seem counter-intuitive, but it actually adds a subtle depth of flavor. But do not worry bcoz the ice cream cools everything down.


This moist layer cake offers a nice twist on an old classic. It needs the ice cream to cut down the "oh so richness" of the cake. It's a wonderful finish to a special meal. Make it for a dinner party or get-together event and i bet ya they are gone before you know it! Your guests cannot stop raving about it. I will make this cake again and again and again....boy, I'm so gonna get fat!


Here's the recipe you are waiting for:

Prep Time :10 min
Inactive Prep Time :6-8hrs
Cook Time :1 hr 20 mins
Servings : 12-16

You will Need:

1 cup espresso
1 packed cup dark brown sugar
1-3 cinnamon sticks
1 teaspoon ground cayenne pepper
2 sticks (8 ounces) unsalted butter, cubed
12 ounces (2 cups) semisweet chocolate
4 ounces (4 Squares) unsweetened chocolate
6 large eggs, beaten
Ice cream and raspberries, for serving


Directions:

Preheat the oven to 375 degrees F.

Prepare a 9 or 10 inch spring form pan: Cut a circle of parchment the size of the removable bottom of the pan. Fit the parchment circle into the bottom of the pan. Tear off an 18-inch length of aluminum foil. Center the pan over the sheet of foil and crumple and crimp the foil all around the sides of the pan. (The foil will prevent water from seeping into the pan during baking.) Set the pan aside.

In a medium saucepan, bring the espresso, brown sugar and the cinnamon sticks to a simmer over very low heat.

Simmer until the syrup is very fragrant, about 20 minutes. Stir in the butter until melted, and then stir in the cayenne pepper. Set aside.

Pulse the chocolate in the food processor until coarsely chopped. Transfer to a deep bowl.

Pour in the warm coffee syrup and whisk until the chocolate is completely melted. Whisk in the beaten eggs until completely blended.

Scrape the batter into the prepared pan. Set the pan in a large, deep, oven-proof skillet or a roasting pan and set on the oven rack.

Pour in enough water to come halfway up the sides of the pan. Bake until center is set and barely wiggles when you shake the pan gently, 50 to 60 minutes.

Cool the cake to room temperature. Remove the foil and chill the cake in the pan at least 8 hours.

Run a wet knife around the sides of the pan then pop the spring to release. Place a platter on top of the cake and flip over.

Remove the bottom of the pan, and peel off the parchment. Serve with ice cream of your choice and raspberries.


Quick Notes:

1) Make sure that the pan is crumpled properly with the aluminium foil, preferably a thicker one bcoz even a small leak can spoil the whole cake.

2) You can use white sugar instead of brown sugar but y go for a plain one when you can get wonderful molasses and caramel notes with this brown sugar. And i like to go for dark brown instead of a light brown b'coz it really packs in the flavor and it has got nice spongy tackiness.

3) Cinnamon ice-cream goes well with this cake, but you can also try flavours like mango, coconut, mint and even vanilla.


4) For those concerned about the chile heat,be aware that not all cayenne is created equal. It can be either standard or hot with the "glow" level dependent on what kind and where it was produced.
To lower the heat but keep the chile flavor, try using ancho chile powder.
You can also try this cake without using cayenne but i like that little kick in my cake.


This cake would be perfect for a birthday party bcoz children would go gaga. So y not you try it next time and make everyone happy.


Hope you had fun watching the slide show and the pics.
Write to me.
See you next time.
Until then, ADIOS!!!

Tuesday, July 28, 2009

Zebra-Striped cake!!

I’ve seen this cake online for a while now, on various blogs and in various forms, but haven’t actually gotten around to trying it myself until now. Visually, I believe that this Zebra-Striped Cake is one of the most impressive looking cakes.

I like looking at Zebra cake more that eating it even though it is incredibly delicious. This cake is very popular in Eastern Europe.The recipe that i have for you is almost similar to a Marble Cake (link) which I made some time back except for the change in patterns.

This pattern looks very intricate, but it is actually very easy to create. It starts with one vanilla batter that is divided in half and has semi-sweet chocolate added to a portion. The batters are alternately spooned into the center of a prepared baking pan to form a bulls-eye design. The trick to getting the design is all in how you lay the batters. Put a spoonful of vanilla batter (about 3 tbsp, for this particular cake) into the center of the pan and let it spread slightly on its own. Put a spoonful of chocolate in the center of the vanilla. It will push out the other batter and, as it sits for a moment, will spread itself.

Alternating spoonfuls of the two batters, you simply repeat the technique until all the batter has been used up. You can tap the pan on the counter gently to help it spread and eliminate air bubbles, but the batter really must be allowed to spread on its own. This is a fairly plain cake and, while it does have a good chocolate and vanilla flavor to it, it isn’t too sweet. The cake is also very moist due to the butter or oil added!

So i did some mix n match and came out with this recipe. Pls try the below recipe with confidence. Its been tested and tried by me and i guarantee you amazing results.


You will need:

2 ounces Semi-sweet chocolate, chopped
1 tablespoon brewed coffee or espresso
2 cups cake flour (i use All-Purpose bleached, pre-sifted flour)
1 tablespoon baking powder
1/2 teaspoon baking soda
1/4 teaspoon salt
1/2 cup unsalted butter
1 1/4 cups granulated white sugar
2 large eggs
2 teaspoons pure vanilla extract
3/4 cup sour cream
1/3 cup milk

PS: Instead of semi-sweet chocolate and brewed coffee, you may also use 2 tsps dark cocoa powder, make sure it is not very bitter. Dutch processed cocoa powder is the best.

Instead of 1/2 cup butter, you may use 1 cup vegetable oil.
Directions:
Preheat oven to 350 degrees F and place rack in center of oven. Butter, or spray with a non stick spray, the cake pan.

In a stainless steel bowl, over a saucepan of simmering water, melt the semisweet chocolate with the coffee. Remove from heat and set aside.

In a separate bowl sift together the flour, baking powder, baking soda and salt. Set aside.

In bowl of electric mixer, cream the butter. Gradually add the sugar and continue to beat until the mixture is light and fluffy (about 5 minutes). Add beaten eggs, one at a time, mixing well after each addition. Beat in the vanilla extract and sour cream.

With the mixer on low speed alternately add the flour mixture and the milk to the batter, in three additions, beginning and ending with the flour.

After preparing the batter, pour half of the batter into a separate bowl. Stir the melted chocolate into one half of the batter, mixing well.

The most important part is assembling the cake batter in a baking pan. This is what you do. Scoop 3 tablespoons of plain batter into the middle of the baking pan. Then scoop 3 tablespoons of cocoa batter and pour it in the center on top of the plain batter.

IMPORTANT! Do not stop and wait until the previous batter spreads - KEEP GOING! Do not spread the batter or tilt the pan to distribute the mixture. It will spread by itself and fill the pan gradually. Continue alternating the batters until you finish them.


Bake in the oven for about 50 minutes. Do not open the oven door at least the first 30 minutes or the cake will shrink and will not rise. To check if the cake is ready, insert a toothpick into the center. It should come out clean when ready. Remove from the oven. Immediately run a small thin knife around the inside of the pan to loosen the cake, then invert the cake onto a cooking rack. Turn the cake back over and let cool.

This Zebra cake goes perfectly well with a cup of strong tea.


You can sprinkle the top of the cake with some powdered (confectioner’s) sugar or leave it plain.


Few more clicks!


Hope you enjoyed the making of this cake!
Wanted to share some of my awards too but this post is long already.....will do it in the next post!
That's all for the week....adios!

Tuesday, June 23, 2009

Chocolate Wafers!!

I love these Chocolate Wafers as their texture is wonderfully crisp and crunchy and their chocolate flavor is rich. Although there are many chocolate cookies to choose from, i love to snack on these wafers, reason being these are tastier and at the same time much lower in fat.

Chocolate Wafers use the most basic of ingredients, butter, sugar, eggs, flour, vanilla, and cocoa powder. What is so different about this recipe is the reduction in fat. This chocolate wafer uses just three tablespoons of butter. And instead of using the whole egg, only the white is used. Of course, the main ingredient in these cookies is cocoa powder.

Once the cookie batter is made it is formed into a log shape and refrigerated until firm. Then sliced into thin wafers and baked until they are puffed with crackles. The longer you bake these cookies the more crisp and crunchy they will be. So if you want a softer textured cookie, bake them a little less than stated. These chocolate wafers can be stored for about 10 days.

Here's the recipe for you:

You will Need:

1 cup all purpose flour
1/2 cup unsweetened cocoa powder
1/4 teaspoon baking soda
1/4 teaspoon salt
3 tablespoons unsalted butter, room temperature
2/3 cup packed light brown or dark brown sugar
1/2 cup white granulated sugar
1 teaspoon pure vanilla extract
1 large egg white


Directions:

In a bowl, whisk together the flour, cocoa powder, baking soda, and salt.

In the bowl of your electric mixer (or with a hand mixer), cream the butter. Add the sugars and vanilla extract and beat on high speed for about one minute.

Scrape down the sides of the bowl. Beat in the egg white. Add the flour mixture and beat just until incorporated.

Place the dough on your work surface and, using your hands, form the dough into a log shape that is about 9 inches (23 cm) long.

Carefully wrap the dough in aluminum foil, parchment paper or wax paper and fold or twist the ends. Try not to flatten the log.

Refrigerate for at least one hour or overnight.

Preheat the oven to 350 degrees F and place the oven rack in the center of the oven. Line two baking sheets with parchment paper.

Using a sharp knife, slice into 1/4 inch thick wafers. Place on the baking sheet spacing about 1 inch apart.

Bake for approximately 10-12 minutes or until the the cookies puff and the tops of the cookies have crackles (ripples).

Remove from oven and let cookies cool on baking sheet for about 5 minutes before removing to a wire rack to cool completely.

Can be stored in an airtight container, at room temperature, for about 10 days.

Makes about 36 cookies.


A Quick Thanq Note:

Before signing off I want to pass this thanq note to a couple of friends who appreciated my work with these cute awards. Sorry for being late but your appreciation means a lot to me. I'm so glad to be a part of this blogging world and i would love to stay connected with you.

Thanq Pooja for giving me this chirpy & cheerful blog award... so thoughtful dear, sorry for mentioning it late but better late than never…right!!

Thanq Prathibha and Kalaivani for giving me this lovely blog award……I love your blogs as much as you love mine.

Finally I would like to thank Jyoti for passing on Lovely blogger award and Friends award.
Hey Jyoti, I guess v should thank Andy for this connection. If not for his nutty blog, v wud never have met…I just love those endless crazy comments that we post on his blog.

Once again thanks a lot for the lovely awards gals. I truly cherish them.

So that's all for today. Will come back again with some interesting temptation.

Stay tuned as always!!

Monday, May 11, 2009

Molten Chocolate Cake!!

This dessert has been described as souffle-like, cake-like, brownie-like, mousse-like, and pudding-like, and that is because it has all of these characteristics.

Molten Chocolate Cakes have a rich and chocolately flavor, and a texture that is dense and moist. These cakes will rise beautifully as they bake (like a souffle), but once they are removed from the oven they will slowly deflate.

As their name implies, Molten Chocolate Cakes are usually served hot, but leftovers can be refrigerated and eaten cold the next day.

They have an intense chocolate flavor so be sure to use a very good dark chocolate. You can use either a bittersweet or semi sweet chocolate. Because this cake is quite rich, i don't like to use anything as a topping........it just melts in your mouth!!

When making these cakes you can use individual ramekins, molds, custard cups, or even muffin tins. The cakes can be served in their molds but if you want to remove them from their cups before serving, it is important to generously butter each mold so the baked cakes release easily onto your serving plate. You may want to first run a sharp knife around each cake before unmolding.

The batter can be made several hours in advance of baking. Just pour the batter into the individual molds, cover each mold with plastic wrap, and refrigerate until you are ready to bake them.

The cakes are baked until set, yet the centers will still look a little wet and wobbly. As the cakes cool the chocolate sauce in the center of the cake will continue to set.


Tempting already!!!!!!

Here's the recipe for you:

You will need:

4 ounces bittersweet chocolate chopped into small pieces

4 ounces semi-sweet chocolate, chopped into small pieces

3/4 cup unsalted butter cut into pieces

3 eggs

1/2 cup granulated white sugar

1/4 cup all-purpose flour

1 tablespoon unsweetened cocoa powder

2 teaspoons pure vanilla extract

1 teaspoon instant espresso powder or 2 teaspoons instant coffee granules

1/2 teaspoon salt

Directions:

Preheat oven to 375°F. Liberally spray ramekins or molds or custard cups with nonstick spray. In a small saucepan over low heat melt the chocolate and butter, stirring often to prevent burning. Remove from heat and cool.

In a large mixing bowl, beat eggs and sugar with electric hand mixer until "ribbon" stage, approximately 7 minutes. At that stage, it will be pale yellow and look like lightly whipped cream.

Add flour, cocoa powder, vanilla extract, espresso powder, and salt. Beat the batter for 2 additional minutes; add the melted chocolate mixture and beat another 5 minutes.


Scoop the batter into the prepared ramekins, approximately 3/4 cup of batter in each ramekin.

NOTE: At this point, the cakes can be refrigerated and then baked later.


When ready to bake, place the ramekins on a baking sheet and bake 15 to 17 minutes or until puffed and mostly dry on top around edges.

NOTE: It's critical to bake these cakes for the right amount of time. Otherwise, they'll either be way too "molten," or end up as brownies. Oven temperatures vary, so check the cakes after 15 minutes. If they're really moist on top, bake one minutes and check again.

Remove cakes from oven and let rest 3 minutes (it's okay if they sink a little).


To unmold, place serving plate on top of ramekin and invert. Carefully remove ramekin, tapping lightly on the plate to loosen cake.

Serve the molten cakes warm.


Makes 6 servings.


As I mentioned above, while these cakes are typically served hot, leftovers can be covered and refrigerated.

Serve them with either softly whipped cream or even vanilla ice cream, but i like to keep it plain!


That is all about the molten chocolate cakes..................hope you enjoyed seeing the post, cya next week with yet another Temptation!!

Thursday, May 7, 2009

Marble Cake!!

Marble Cake, fragrant and mouth-watering , will serve a great palatable dessert on your table.

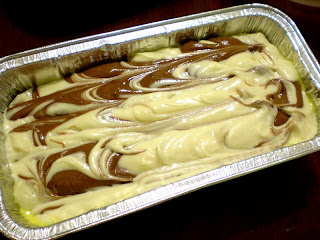
I’ve been trying many marble cake recipes but trust me, this is the best one so far. This pound cake is rich and moist with lovely swirls of white and chocolate batters.

Marble cakes may look complicated, but they actually start with a white batter. Once the batter is made it is divided in half and then melted semisweet chocolate is added to one half. The marbling is created by placing the white and chocolate batters alternately in a bundt pan or loaf pan and then running your knife through the two batters to blur the lines.

If you are using a dark colored pan, make sure to reduce the oven temperature to 325 degrees F (165 degrees C). This is done because dark colored pans absorb more of the energy coming from the oven walls so the pan becomes hotter and transmits heat faster than light colored pans. Reducing the oven temperature slightly will help compensate for this.

I usually serve this cake plain, with just a dusting of powdered sugar, but you can frost it with your favorite chocolate icing or else a Chocolate Glaze.

Here's the recipe for you:

You will Need:

1/2 cup semisweet chocolate, chopped

1 tablespoon brewed coffee or espresso

2 1/4 cups cake flour (I use All-Purpose bleached, pre-sifted flour)

1 tablespoon baking powder

1/2 teaspoon baking soda

1/4 teaspoon salt

1/2 teaspoon ground cinnamon (optional)

1/2 cup unsalted butter

1 1/4 cups granulated white sugar

2 large eggs

2 teaspoons pure vanilla extract

3/4 cup sour cream

1/3 cup milk

Directions:

Preheat oven to 350 degrees F and place rack in center of oven. Butter, or spray with a non stick spray, the bundt pan or loaf pan.

In a stainless steel bowl, over a saucepan of simmering water, melt the semisweet chocolate with the coffee. Remove from heat and set aside.

In a separate bowl sift together the flour, baking powder, baking soda, salt, and ground cinnamon. Set aside.

In bowl of electric mixer, cream the butter. Gradually add the sugar and continue to beat until the mixture is light and fluffy (about 5 minutes). Add beaten eggs, one at a time, mixing well after each addition. Beat in the vanilla extract and sour cream.

With the mixer on low speed alternately add the flour mixture and the milk to the batter, in three additions, beginning and ending with the flour.


After preparing the batter, pour half of the batter into a separate bowl. Stir the melted chocolate into one half of the batter, mixing well.


Place the batter into the prepared pan by alternating spoons of vanilla batter and chocolate batter. Then, with the end of a wooden spoon, gently draw swirls through the batter to marbleize it. Don't over mix or you won't have that wonderful marble affect. I generally run my knife horizontally n vertically!


Bake for about 50 - 60 minutes, or until a toothpick inserted in the center comes out clean. Remove from oven and place on a wire rack to cool for about 10 minutes before removing the cake from the pan to cool completely.


Serve warm or at room temperature. This cake will keep for a couple of days at room temperature or it can be frozen.


Enjoy some more pics!


Hope you liked this post........................try the recipe this time and enjoy!!
Weekend is nearing, so have fun!!

Friday, April 10, 2009

I go Chocolaty!!

Dear Friends, I feel so honored to see a huge response on my earlier post (Mini Kaja), not only I got amazing comments but some of you also tried to check if I was doing alright now……… your words were like ELIXIR to me, touchwood!!

When I started my blog 2 months back, all I had was just a NAME and a simple-silly xplanation for it (link)…… but look what I have now…..YOU ALL!!!!! I’m glad I started Temptations! I wud like to thank each and every one for your wonderful support. And what possibly can be the best way to show my gratitude!!!

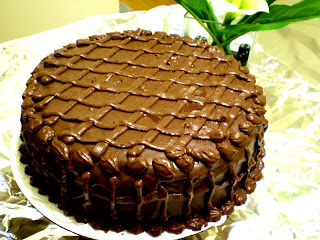
So i decided to GO CHOCOLATY today and made this chocolate cake with chocolate frosting. Since i made a cake anyways, i'm sending it to the event For the Love of Chocolate hosted by Poornima.


For MAKING OF CHOCOLATE CAKE
You will need:
2 cups sugar
1-3/4 cups all-purpose flour
3/4 cup HERSHEY'S unsweetened Cocoa
1-1/2 teaspoons baking powder
1-1/2 teaspoons baking soda
1/2 teaspoon salt
2 eggs
1 cup milk
1/2 cup vegetable oil
2 teaspoons vanilla extract
1 cup boiling water


Directions:

Pre-Heat oven to 350°F.
Grease and flour the baking pan, you can use any shape.
Stir together sugar, flour, cocoa, baking powder, baking soda and salt in large bowl.
Add eggs, milk, oil and vanilla; beat on medium speed of mixer for 2 minutes.
Stir in boiling water. This will make the batter lil thinner.
Pour batter into the prepared pan.
Bake 30 to 35 minutes or until wooden pick inserted in center comes out clean.
Cool 10 minutes; remove from pan .

Frosting has to be done only after the cake cools completely otherwise icing will just melt.

For MAKING OF CHOCOLATE FROSTING

You will need:

1/2 cup (1 stick) butter or margarine
2/3 cup HERSHEY'S unsweetened Cocoa
3 cups powdered sugar
1/3 cup milk
1 teaspoon vanilla extract

Directions:

Melt butter. Stir in cocoa.
Alternately add powdered sugar and milk, beating to spreading consistency.
Add small amount additional milk, if needed.
Stir in vanilla.
It makes about 2 cups frosting.

How about caramel topping on the cake, it just tastes heavenly!!

For those of you who don't have time, to make things simpler and quicker you can use storebought cake mix and prepare the cake. You can get frosting also from the store but i personally prefer home made frosting as it will have a consistency and freshness. Once again i thank you all for being there! Have a nice day!