Sunday, May 31, 2009

Sour Cream Coffee Cake!!

If you’re looking for an out-of-this-world, above and beyond coffee cake, you’ve come to the right post.

I don’t recommend making this cake if you are already hungry, because the smell that wafts from the oven is so sinfully delicious that it might make you want to lick the oven door.

Coffee cakes are instantly recognizable by their streusel topping ('streusel' is German for 'sprinkle') made from a delicious mixture of sugar, flour, and spices to which nuts and oats are often added.

This Coffee Cake Recipe starts with a batter that does use sour cream but is more tender in taste and texture because it contains cake flour instead of all purpose flour. The use of cake flour gives a lighter, less-dense texture to the cake . Then, the streusel mixture is made with brown sugar, lots of toasted nuts, chocolate chips and cinnamon and is used to both fill and top the cake. Try serving this cake while it is still warm from the oven with a dollop of softly whipped cream or even vanilla ice cream. You won't be disappointed.


Here's the recipe for you:

Yield: 8 to 10 Servings

For the cake you will need:

12 tablespoons (1½ sticks) unsalted butter at room temperature
1½ cups granulated sugar
3 extra-large eggs at room temperature
1½ teaspoons pure vanilla extract
1¼ cups sour cream
2½ cups cake flour (not self-rising)
2 teaspoons baking powder
½ teaspoon baking soda
½ teaspoon salt
For the streusel:
¼ cup light brown sugar packed
½ cup all-purpose flour
1½ teaspoons ground cinnamon
¼ teaspoon salt
3 tablespoons cold unsalted butter
¾ cup chopped walnuts, optional


Directions:

Preheat the oven to 350° F. Grease and flour a 10-inch tube pan or cake pan.
Cream the butter and sugar in the bowl of an electric mixer fitted with the paddle attachment for 4 to 5 minutes, until light.

Add the eggs 1 at a time, then add the vanilla and sour cream.

In a separate bowl, sift together the flour, baking powder, baking soda, and salt.

With the mixer on low, add the flour mixture to the batter until just combined. Finish stirring with a spatula to be sure the batter is completely mixed.

For the streusel, place the brown sugar, flour, cinnamon, salt, and butter in a bowl and pinch together with your fingers until it forms a crumble.

Mix in the walnuts, if desired.

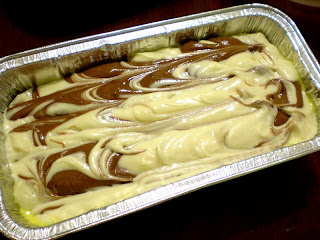
Spoon half the batter into the pan and spread it out with a knife.

Sprinkle with 3/4 cup streusel.

Spoon the rest of the batter in the pan, spread it out, and scatter the remaining streusel on top.

Bake for 50 to 60 minutes, until a cake tester comes out clean.

Let cool on a wire rack for at least 30 minutes.

You can also use maple syrup and confectioner sugar for glaze if you want. But i like to keep it plain.

This is the recipe for the week......hope you enjoyed the making!!

Tuesday, May 26, 2009

Door County, Wisconsin!

We'd been to Door county, Wisconsin for the memorial day weekend and enjoyed the exquisite beauty of the various islands in the door peninsula. With over 300 miles of scenic shoreline dotted with bustling harbors and quiet coves, Door County offers a wealth of water-based recreation. Sandy beaches, sailing, cruising, boating, fishing, boat rentals, charters or a unique car ferry ride to Washington Island are just a few ways to enjoy the sparkling waters of Green Bay and Lake Michigan.

Small wonder Door County was named one of the top ten vacation destinations in North America. There were some breathtaking landscapes! The changing seasons add to the beauty of the peninsula. Presenting some of the best shots!


Will see you shortly with a Temptation, stay tuned!

Sunday, May 17, 2009

Potluck Desserts!!

The very idea of potluck sounds so exciting isn’t it…..!!!!!!!!!!! You get to eat different varieties of food and have so many luscious dishes in front of you! I enjoy this event a lot as u get to meet people, make new friends, gal gossips which never ends, recipe sharing and so many other fun things.

This weekend we had a potluck lunch at a friend's place and all the expert cooks decided to bring on their speciality dishes.........oh my my there was a huge list of items right from vegetarian items, non-vegetarian to rice items and all were equally tempting.


It becomes a difficult job when you have so many temptations around but do not have the apetite to eat all of them.....there were some 20-25 dishes lined up and the difficult part was where to begin!!!!


So here's what I made for the potluck:

1. Chocolate cake with butter cream icing

2. Dark chocolate plain cake

3. Mysore-pak (South-indian fudge)


And here are the recipes for you

1. Chocolate cake recipe:

You will need:

1 1/2 cups (195 grams) all purpose flour

1 cup (200 grams) granulated white sugar

1/4 cup (25 grams) unsweetened cocoa powder sifted

1 teaspoon baking powder

1 teaspoon baking soda

1/4 teaspoon salt

1/3 cup (75 grams) unsalted butter, melted

1 cup (240 ml) warm water

1 tablespoon lemon juice

1 teaspoon pure vanilla extract

Directions:

Preheat oven to 350 degrees F and place rack in center of oven.

In an ungreased round cake pan, stir together the flour, sugar, sifted cocoa powder, baking powder, baking soda, and salt.

Add the melted butter, water, lemon juice, and vanilla extract.

With a fork, mix all the ingredients together until well blended.

Bake in preheated oven for about 35 minutes, or until the cake springs back when lightly pressed and a toothpick inserted in the center of the cake comes out clean.

Remove from oven and place on a wire rack to cool.


Butter Cream Icing recipe:

You will need:

2 sticks butter, room temperature
2 cups Crisco shortening

1 teaspoon butter flavoring (Wilton’s makes the best flavored version)

1 teaspoon pure vanilla extract

2 pounds powdered sugar

1/2 teaspoon salt

1 tablespoon meringue powder (optional but the texture will be smoother)

Water as necessary (I usually add about 2 tablespoons )

PS: You can purchase meringue powder at your local grocery store under the brand name of Just Whites.

Directions:

In the mixer, mix butter, Crisco shortening, and salt together to incorporate, about 5 minutes on low.

Add butter and vanilla extract. Mix together well. Add about 1 pound of powdered sugar and the meringue powder and mix.

Add 1/2 cup of powdered sugar at a time and mix until you get the consistency you want.

Add a little milk, a teaspoon at a time, if necessary to thin the frosting. Blend well on low for several minutes.

Tint portions of frosting with desired food color (I use the gel paste food coloring that is available at cake decorating stores and party stores).

Use immediately or cover and refrigerate.

NOTE: Buttercream Icing will last for weeks as long as it is well sealed.


2. Dark Chocolate Plain cake recipe:

You will need:

3 cups readymade Cake mix (sugar added)

1/3 cup butter

2 eggs


Directions:

In an ungreased loaf pan, mix together the flour, butter and eggs.
Sir all the ingredients together until well blended.

Bake in preheated oven for about 30 minutes, or until the cake springs back when lightly pressed and a toothpick inserted in the center of the cake comes out clean.

Remove from oven and place on a wire rack to cool.

Cut into desired rectangles.

3. Mysore pak recipe:

I posted a mysore-pak recipe earlier. So you may pls check the link.

http://arunathetemptations.blogspot.com/2009/04/mysore-pak-south-indian-fudge.html

But here are the pics:


So these were the potluck desserts that i made for the party.........that is all for today, have a great week ahead!!!!

Monday, May 11, 2009

Molten Chocolate Cake!!

This dessert has been described as souffle-like, cake-like, brownie-like, mousse-like, and pudding-like, and that is because it has all of these characteristics.

Molten Chocolate Cakes have a rich and chocolately flavor, and a texture that is dense and moist. These cakes will rise beautifully as they bake (like a souffle), but once they are removed from the oven they will slowly deflate.

As their name implies, Molten Chocolate Cakes are usually served hot, but leftovers can be refrigerated and eaten cold the next day.

They have an intense chocolate flavor so be sure to use a very good dark chocolate. You can use either a bittersweet or semi sweet chocolate. Because this cake is quite rich, i don't like to use anything as a topping........it just melts in your mouth!!

When making these cakes you can use individual ramekins, molds, custard cups, or even muffin tins. The cakes can be served in their molds but if you want to remove them from their cups before serving, it is important to generously butter each mold so the baked cakes release easily onto your serving plate. You may want to first run a sharp knife around each cake before unmolding.

The batter can be made several hours in advance of baking. Just pour the batter into the individual molds, cover each mold with plastic wrap, and refrigerate until you are ready to bake them.

The cakes are baked until set, yet the centers will still look a little wet and wobbly. As the cakes cool the chocolate sauce in the center of the cake will continue to set.


Tempting already!!!!!!

Here's the recipe for you:

You will need:

4 ounces bittersweet chocolate chopped into small pieces

4 ounces semi-sweet chocolate, chopped into small pieces

3/4 cup unsalted butter cut into pieces

3 eggs

1/2 cup granulated white sugar

1/4 cup all-purpose flour

1 tablespoon unsweetened cocoa powder

2 teaspoons pure vanilla extract

1 teaspoon instant espresso powder or 2 teaspoons instant coffee granules

1/2 teaspoon salt

Directions:

Preheat oven to 375°F. Liberally spray ramekins or molds or custard cups with nonstick spray. In a small saucepan over low heat melt the chocolate and butter, stirring often to prevent burning. Remove from heat and cool.

In a large mixing bowl, beat eggs and sugar with electric hand mixer until "ribbon" stage, approximately 7 minutes. At that stage, it will be pale yellow and look like lightly whipped cream.

Add flour, cocoa powder, vanilla extract, espresso powder, and salt. Beat the batter for 2 additional minutes; add the melted chocolate mixture and beat another 5 minutes.


Scoop the batter into the prepared ramekins, approximately 3/4 cup of batter in each ramekin.

NOTE: At this point, the cakes can be refrigerated and then baked later.


When ready to bake, place the ramekins on a baking sheet and bake 15 to 17 minutes or until puffed and mostly dry on top around edges.

NOTE: It's critical to bake these cakes for the right amount of time. Otherwise, they'll either be way too "molten," or end up as brownies. Oven temperatures vary, so check the cakes after 15 minutes. If they're really moist on top, bake one minutes and check again.

Remove cakes from oven and let rest 3 minutes (it's okay if they sink a little).


To unmold, place serving plate on top of ramekin and invert. Carefully remove ramekin, tapping lightly on the plate to loosen cake.

Serve the molten cakes warm.


Makes 6 servings.


As I mentioned above, while these cakes are typically served hot, leftovers can be covered and refrigerated.

Serve them with either softly whipped cream or even vanilla ice cream, but i like to keep it plain!


That is all about the molten chocolate cakes..................hope you enjoyed seeing the post, cya next week with yet another Temptation!!

Thursday, May 7, 2009

Marble Cake!!

Marble Cake, fragrant and mouth-watering , will serve a great palatable dessert on your table.

I’ve been trying many marble cake recipes but trust me, this is the best one so far. This pound cake is rich and moist with lovely swirls of white and chocolate batters.

Marble cakes may look complicated, but they actually start with a white batter. Once the batter is made it is divided in half and then melted semisweet chocolate is added to one half. The marbling is created by placing the white and chocolate batters alternately in a bundt pan or loaf pan and then running your knife through the two batters to blur the lines.

If you are using a dark colored pan, make sure to reduce the oven temperature to 325 degrees F (165 degrees C). This is done because dark colored pans absorb more of the energy coming from the oven walls so the pan becomes hotter and transmits heat faster than light colored pans. Reducing the oven temperature slightly will help compensate for this.

I usually serve this cake plain, with just a dusting of powdered sugar, but you can frost it with your favorite chocolate icing or else a Chocolate Glaze.

Here's the recipe for you:

You will Need:

1/2 cup semisweet chocolate, chopped

1 tablespoon brewed coffee or espresso

2 1/4 cups cake flour (I use All-Purpose bleached, pre-sifted flour)

1 tablespoon baking powder

1/2 teaspoon baking soda

1/4 teaspoon salt

1/2 teaspoon ground cinnamon (optional)

1/2 cup unsalted butter

1 1/4 cups granulated white sugar

2 large eggs

2 teaspoons pure vanilla extract

3/4 cup sour cream

1/3 cup milk

Directions:

Preheat oven to 350 degrees F and place rack in center of oven. Butter, or spray with a non stick spray, the bundt pan or loaf pan.

In a stainless steel bowl, over a saucepan of simmering water, melt the semisweet chocolate with the coffee. Remove from heat and set aside.

In a separate bowl sift together the flour, baking powder, baking soda, salt, and ground cinnamon. Set aside.

In bowl of electric mixer, cream the butter. Gradually add the sugar and continue to beat until the mixture is light and fluffy (about 5 minutes). Add beaten eggs, one at a time, mixing well after each addition. Beat in the vanilla extract and sour cream.

With the mixer on low speed alternately add the flour mixture and the milk to the batter, in three additions, beginning and ending with the flour.


After preparing the batter, pour half of the batter into a separate bowl. Stir the melted chocolate into one half of the batter, mixing well.


Place the batter into the prepared pan by alternating spoons of vanilla batter and chocolate batter. Then, with the end of a wooden spoon, gently draw swirls through the batter to marbleize it. Don't over mix or you won't have that wonderful marble affect. I generally run my knife horizontally n vertically!


Bake for about 50 - 60 minutes, or until a toothpick inserted in the center comes out clean. Remove from oven and place on a wire rack to cool for about 10 minutes before removing the cake from the pan to cool completely.


Serve warm or at room temperature. This cake will keep for a couple of days at room temperature or it can be frozen.


Enjoy some more pics!


Hope you liked this post........................try the recipe this time and enjoy!!
Weekend is nearing, so have fun!!

Monday, May 4, 2009

Holland, Michigan Tulip Tour!!

After seeing all those Tulip pics in many blogs, i was so tempted to go and visit and yesterday was the day.
Tulip Time in Holland, MI is the official celebration of one of the largest Dutch ethnic events in the midwest United States. If you have always wanted to see a close imitation of the Netherlands, visit Holland, MI to see beautiful tulip fields in full bloom.

Visitors from all over the world come to see millions of tulips planted in parks, gardens and lanes throughout the Holland, Michigan community.


Some of the highlights of holland visit are Dutch culture with tulips, parades, street scrubbing, carnival, Dutch Dancers, concerts, theatre shows, art and craft fair, fireworks, kids events, trolley tours, and so much more!

If you are taking children and the family to Holland, make sure to visit Nelis' Dutch Village. Dutch Village is a family theme park, it offers a beautiful setting for family fun.

Last year i enjoyed Tulips in Niagara(link), and this year it was Holland, check out some of the beautiful tulips.


There are a lot more beautiful pics to show you but too much of anything is not good...........so i end it up here.

Have a nice day!